Sunday, August 13, 2017

Peer pressure is real

Here is a skeptical  face with my newest self-made frock.  It's my third Laurel, by Colette Patterns, and despite the expression I'm sporting, I'm relatively pleased.  


The Laurel is a relatively basic sheath dress that is a great use for fun fabrics.  This one is a Cotton and Steel quilting cotton that I lined with a kind of fuschia/magenta in order to give it better drape and to make it nice and soft and slinky on the inside.  (Sarah Watts, Cat Lady, Purrfect Hiding Spot)

These are cut relatively short, so they fall a few inches above the knee for me, which is perfect for wearing with leggings (ie, my favorite outfit combination.)

As I mentioned in the instagram post about this dress, I totally forgot to add my custom pockets.  I used french seams to close all of the seams, so at least for now, I'm just going to leave it pocket less.  I'll be honest though, having pockets is like half of the point of making your own dresses, so I may find the time to undo and add them back in.

The Laurel uses bias tape to bind the sleeve and neckline, but as I'll discuss in a minute, I don't like that look, so I used the bias tape to instead creating a folded seam for the neckline.  There is probably a more official way to say this.  Though this worked perfectly on a Laurel top I'm gifting to my mom, you can kind of see in this picture that the neckline is basically perpendicular to my body.  This is not how necklines should lie.  Again, we'll see if I do anything about it.  Maybe it'll loosen up after a wash?

Just finished this, so no notes on wear yet, though.......

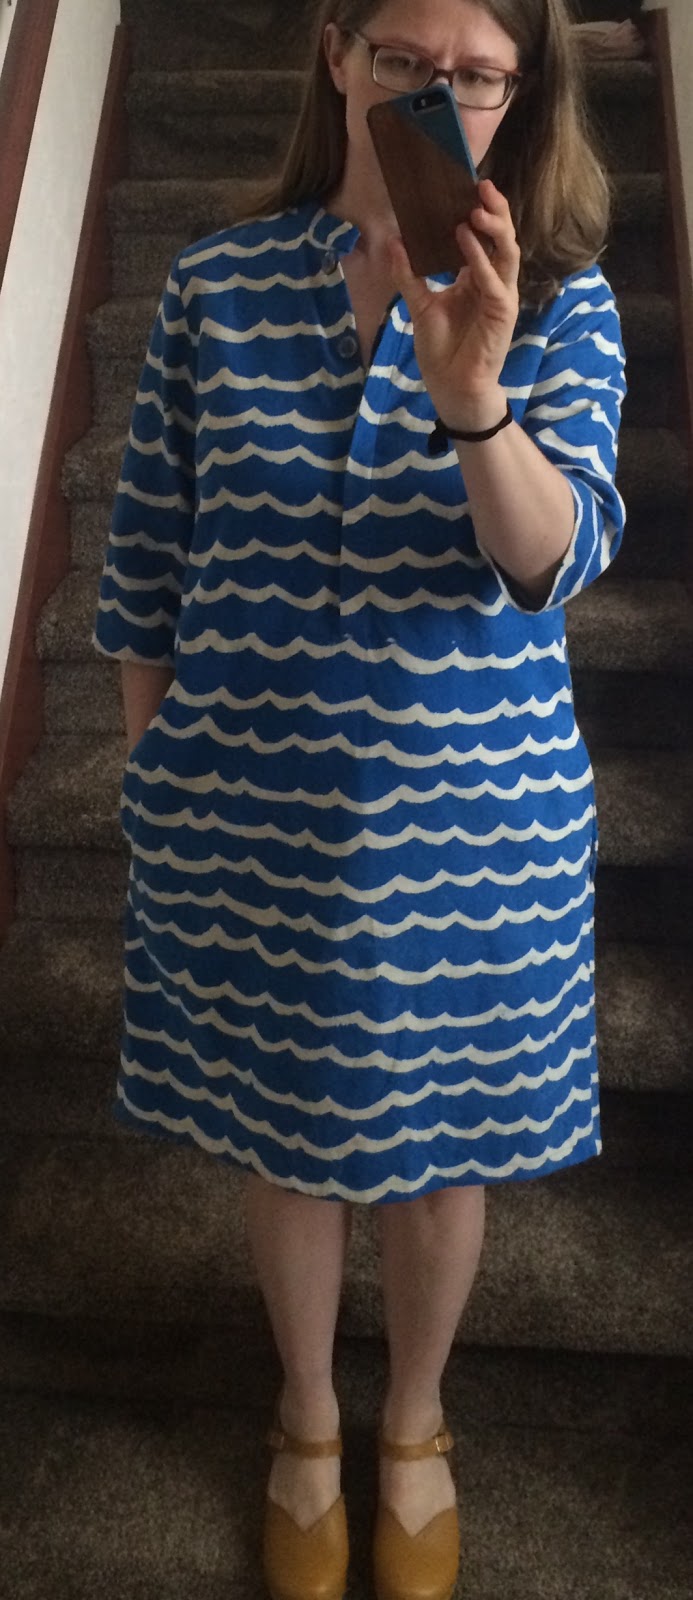
Below is my second Laurel.  I LOVE this dress and would wear it all of the days.  I installed the sleeves upside down, and I really don't like the bias tape as binding for the neckline and sleeves.  It's hard to sew and capture both sides, and my stitching loops sloppy and therefore more homemade. Also, anyone who can point to a ready made garment that uses bias tape like this wins a prize, because I don't think it happens.

Despite all of those criticisms, as I said, I looooove this dress.  It's black and white, so I feel like it's 100% work appropriate, but it's another Cotton and Steel by Alexia Marcelle Abegg, and while it's name is kinda of eh, I think I read a description of it as being 'all of the things you would find in a magical barn', so I call it my magical barn dress.  Yes, there are rabbits, of course.


Not picture are:

1) my very first Laurel, which might have been a second or third dress?  It was a wearable muslin I made with maybe 2 yards, but maybe less of a green corduroy I had purchased to make a skirt.  That's the other thing great about this pattern! It's only a few pieces (front, back, sleeves, bias binding), and it's light on fabric    I like it, and have worn it belted and not belted, but because the dress and styling are so plain, I do like the print version better - more visual interest.  

3) A Laurel top I made that my mom will receive when I remember to go to the post office.  I used HEB's old curtains, and it's light and airy and I quite like the shape.  I was trying to test out how to do a Full Bust Adjustment, and used bad instructions, so I decided to just make the top normally, but then forgot to readjust the sizing.  Ah well, nice to give my mom a handmade top.  But I would put the Laurel top on my sewing list for tops. Nice length and decent visual interest.

OH, and a note on these - I did an invisible zipper for the two pictured, without an invisible zipper foot, but using this tutorial, and found it very easy both times.  Highly recommended. 

Thursday, June 1, 2017

me made May 2017 (29 May to 31 May)

As I found that I had pretty easily met my me made May goal (wearing two different me-mades each week in May), I decided to wear one me-made each day for the last 3 days of the month.

On 29 May, the weather cooperated and I was able to wear my Tamarack jacket.  On 30 May, it was a knit Linden (of course).  And on 31 May, I wore my Nani Iro brushed cotton Fen top for the first time in months.

Clearly, me made May has shown me that, right now, I would wear as many stretchy knit tops as I could sew.  But I'm entering June with an excitement to finish up some me-mades that only need a little bit of attention to become wearable.  My first Fen dress, for example, really just needs me to chop off the sleeves to become a totally wearable dress rather than sitting in a sewing basket.  I have a knit Scout tee that similarly requires only a little time to go from WIP to wearable.  And I have a simple raglan pullover that is just missing one elbow length sleeve.  I'm not sure why any of these have lingered as long as they have, except that I put them aside for something shiny and exciting.  Yet in a month where I expect to count crafting time in minutes rather than hours-- so starting a new project would be foolhardy-- the possibility of completing even one of these projects makes me super happy.  This year, that may be what me made May has left me with: a reminder that I'm happiest when I'm wearing something that I've made, imperfections and all, and a renewed energy to try to carve out time to add to my me-made wardrobe.

Tuesday, May 30, 2017

me made May 2017 (22 May to 28 May)

Nothing much to report around here: I was sick for a good chunk of this week, so it was only about halfway through that I realized I needed to get my me-mades in.  So, of course, I then wore my knit Lindens to make sure that I was covered for my goal.  I did add two additional me-made garments in this week, and wore them together due to chilly May weather.


My rayon Helmi dress with my Tamarack jacket.  

I love that I am getting wear out of the Tamarack Jacket in May, so don't view this as a complaint about the chilly temps!  If only it inspired me to finish the handsewing on it!

Monday, May 29, 2017

work in progress, May 2017

I haven't really been knitting that much in the past 5.5 months, largely because I haven't figured out how to knit one-handed yet.  I've just started work on a Porphura sweater and am squeezing in a row here and there when I can.  

I'm using Madelinetosh Euro Sock in the colors Joshua Tree and Pink Clay/Optic.  Initially, my plan was to do approximately 4" alternating stripes of both colors, with all the ribbing in Joshua Tree.  I'm now second guessing that decision and wondering if I want narrower stripes of Pink Clay/Optic.  (But that might mean I don't have enough Joshua Tree to finish the cardigan.)  [Update: After consultation with Elizabeth, I'm going to stick to the original plan for now.]

Although the pattern is written for sport weight yarn, I got gauge with the light fingering weight Euro Sock on US5s.  I'm really loving the fabric made by the Euro Sock-- which sadly may be discontinued as I can't find it on the Madelinetosh website anywhere.  At this gauge, it feels more like a cashmere blend than a pure merino, and is super satisfying to knit.  I have found that Madelinetosh yarns often have a very strong and not super pleasant smell about them.  I've not found this to be true when purchasing them in person, but have experienced it when ordering online either directly from Madelinetosh or from Webs.  In the past, I've tried washing out the skein or keeping them sequestered without much success.  For these skeins, I just let them air out for a couple of months before knitting with them (took them out of their plastic bag and put them on top of a bookshelf) and the smell is no longer noticeable.

This is the first raglan I've knit for myself since finishing my Dessine Moi Un Mouton (yet unblogged).  I'm enjoying how easy and mindless this raglan shaping is in contrast to the Mouton, however, I can already see that the Mouton may have ruined 1:1 raglan increases for me.  The Mouton uses a much more complicated raglan shaping, which is a pain while you're knitting it, but produces a really lovely raglan curve that hugs your shoulder in a way that the 1:1 shaping cannot.

This sweater is one of three knit items that are part of my MakeNine2017 list.  I haven't made much progress on this list: the only thing that I've made from it so far is the Helmi Dress.  Hopefully, I'll keep chugging away at this here and there so that I can check it off the list.

Saturday, May 27, 2017

me made May 2017 (15 May to 21 May)

Again my knit Lindens were the stars with all three being worn this week.  Clearly, I need to make more knit Lindens!  I got a picture of the one that I use as a pajama top; you can see dramatically how uneven my raglan seam was on this, my first Linden.  You can also see that I didn't bother fixing a tuck on the neckline.  (That zig zag stitch is a pain to unpick!)


Branching out from my Lindens, I did also wear my double gauze Fen top this week.  Which made me want a double gauze Fen dress.  (Not to mention my daydreams of a rayon Fen dress after seeing this one.). Realistically, I won't be sewing for at least the next month, and then I've got a number of more urgent projects than any more Fens so these daydreams won't be realized anytime soon.  I guess it's a good thing I have so many Fens already.


Monday, May 15, 2017

me made May 2017 (8 May to 14 May)

I exceeded my me-made goal this week and wore me-mades on 4 days plus a me-made pajama top on a few days.  One day, I wore the same Linden shirt that I wore last week.  Here are pictures of the additional me-mades from this week (pajamas not pictured):

A Grainline Linden

A Grainline Scout

A Named Patterns Helmi

Clearly, right now, the Linden is getting a ton of wear, and stretchy knits work well for me.  I should maybe reassess my sewing goals for 2017 as they involve no knit patterns, and having a few more me-made knit options would be nice!


Sunday, May 14, 2017

the world is as the world is


My third (and so far final) Helmi was a speed make when I realized I had nothing that I could wear to a memorial service.  I used some rayon ikat from Piedmont Fabrics where I also found buttons for it.


I used French seams throughout except at the waist seam which I bias bound.  The seam allowance on Helmi is only 3/8" so that made a French seam that would catch the button placket at the waist to require more precision that I wanted to attempt.  I did a pretty poor job on the French seams in general, partially because the smaller seam allowance didn't give a lot of wiggle room for grading and because this fabric frayed ridiculously.  On a couple of the seams, I caught so many loose threads in the exterior seam that I had to resew it with a slightly larger seam allowance.  However, after doing so much bias binding, French seams feel super quick and easy!

On this Helmi, I decided not to worry about pattern placement/matching and not to add in-seam pockets.  I regretted both decisions.  I keep feeling for pockets when I wear this and I think the location of the pattern on the collar is super odd.


I don't think I've mentioned on my other Helmi posts that I have done the construction out of order each time.  Basically, I have fully constructed the sleeves and skirt and then gone back to construct the bodice.  On the first one, I did this because I wanted some easy warm-up sewing before tackling the new-to-me button placket and collar.  (I hadn't sewn for about 2 months when I started that one.). I really enjoyed that construction order because the dress is almost entirely finished once you get through the tricky bits of the collar, with only the set-in sleeves and waist hem to finish.

This was the Helmi where I used a type of fabric that was recommended for the pattern, unlike my first two.  Despite really loving this fabric, I don't love the final product.  For me, I think this pattern actually benefits from a fabric that has more structure and less drape even though that's not what the pattern designers intended.  I also got lazy about stay stitching on this one, which turned out to be a poor choice with this fabric since the collar stretched out to be noticeably larger than the neck.


Summary:

PatternHelmi Tunic Dress by Named Patterns
Fabric: Rayon ikat from Piedmont Fabrics; leftover scraps of Leah Duncan Art Gallery voile for bias strips.
Thread: Gutermann Mara 100
Buttons: purchased at Piedmont Fabrics
Needles: Microtex 70/10
Modifications: French seams except at waist where bias bound; Folded skirt hem over twice; construction order
Things I'll change next time: Pattern placement on collar; add pockets; staystitch


Saturday, May 13, 2017

rough seas, they carry me


After succesfully making one dress with buttons, I was excited to try to make another for my Easter dress.  I had some Cotton and Steel canvas that I'd wanted to use for a yoked shift dress, however I changed tack upon conferring with Jenny and Elizabeth and decided to make another Helmi.  Since I couldn't find a shift dress pattern that was exactly what I wanted and I didn't really have time to do a muslin, sticking with the Helmi made a lot of sense.

I cut this one a size smaller than my first because I wanted slightly narrower shoulders and the pattern has so much ease that grading wasn't necessary.  I found it to be incredibly difficult to pattern match with this fabric though I tried.  I struggled to even figure out where the repeat was so ultimately settled for good enough.  This worked out okay on the placket but not as well on the side or waist seams.


I again did a mixture of bias binding and Hong Kong seam finishes, using bias strips from quilting cotton that had fishes on it to coordinate with the waves on the canvas.  I used my new clapper to try to flatten the seams to make sewing with the canvas less cumbersome.


I modified the hem to be a high-low hem.  There's probably a better way to do this, but I just lengthened the side seams to the bottom of the shirttail hem and then borrowed the shaping from the Fen pattern pieces, if that makes sense.  I changed up the construction so that I sewed the hem after sewing the side seams since I wasn't doing the shirttail hem.


Again, I added in-seam pockets.  This time, I used a tutorial from Megan Nielsen that includes suggestions of when to finish the various seams, which my sleep-deprived brain found super useful.  In the tutorial, Megan Nielsen shares her trick for making sure the pockets line up.  While reading it, I thought, "Why wouldn't you just know that they lined up because you'd measured properly?"

And then I sewed one pocket piece at 3.75" below the waist and its matching piece at 4.25" below the waist.


I don't know how I managed to do that, except, well, sleep deprivation.  But I very much felt like my hubris had been my downfall, and that I need to cross stitch a sampler with the motto, "Measure twice; bias bind all your seam finishes once."  I had bound all those seams by the time I realized my error and since no one would know about it except me, I didn't bother fixing it.  And now you all know about it.

I found buttons that I thematically loved for this fabric since they looked like driftwood.  However, they were too large for the concealed placket so I scrapped them for other buttons that were reminiscent of driftwood but not as great.  Because these buttons were still a little large, I left off the top collar button and buttonhole.  I knew that I would never use that button and it got very close to the first button on the placket which looked odd to me.


Despite the pocket debacle, I'm pleased with this dress, love the fabric and am thrilled that I got to make my Easter dress this year.


Summary:

Pattern: Helmi Tunic Dress by Named Patterns
Fabric: Cotton and Steel Waves Canvas, purchased at Hawthorne Threads; Cotton and Steel Sardinha Neutral Quilting Cotton for bias strips, also purchased at Hawthorne Threads (now sold out)
Thread: Gutermann 248 (blue); random grays and creams when matching bias tape
Buttons: purchased at Piedmont Fabrics
Needles: Universal 80/12 for attaching bias strips to main fabric; Jeans 100/16 for construction seams
Modifications: Added in-seam pockets (using tutorial from Megan Nielsen); replaced shirttail hem with slight high-low hem using Fen dress pattern as guide; bias bound/ Hong Kong finished seams throughout (using this tutorial from JuJu Vail for the Hong Kong finishes); used bias strip facing for skirt hem (using this tutorial from Colette); left off collar button and buttonhole.
Things I'll change next time: Press seam allowance for inner collar stand at a scant 3/8" to make it easier to catch when stitching in the ditch; smaller buttons; maybe a slightly longer skirt if high-low hem used again; place pockets at the same location.


Tuesday, May 9, 2017

you can't choose who plays the fool


This was my first make of 2017, which was inspired by a need for a looser dress with a front opening.  I hadn't quite seen a pattern that was exactly what I wanted so I was debating between making a Green Bee Pearl Shift (view B with buttons) or extending the placket and adding buttons to either a Wiksten Tova dress or a Liesl and Co Gallery dress.

However, I then saw a flannel Helmi dress by Randomly Happy and my plans changed.  I'd seen the Helmi pattern on the Named Patterns site, but had disregarded it.  I think this was a case of not being able to picture the pattern in a different fabric choice than the sample.  The flannel Helmi, though, was right up my alley.  As the pattern had all the features that I needed, I switched course and plunged in.

I'd been watching a lot of the Great British Sewing Bee so was really excited to try my darndest at pattern matching, to beautifully place the pattern on my lovely Nani Iro brushed cotton, and to use quality seam finishes.  Unfortunately, I was also very sleep deprived and working with a deadline.  So here's how those goals turned out:

1/ Pattern matching: I did a great job at matching most of the back waist seam.


The other seams: not so much.  I recut the left front bodice in an attempt to get a better pattern match once I realized that I'd matched the front bodice pieces along the wrong line.  It was indeed better the second time around but is now just off enough to be really noticeable.  The long repeat on this fabric meant that I ended up using about 5 yards in my failed efforts to pattern match.


2/ Pattern placement: I repeatedly decided that I wanted to avoid having the largest floral cluster down the middle of the dress and... ended up cutting the front pieces with the largest floral cluster smack in the middle of the dress.  I can only blame this on sleep deprivation.


3/ Quality seam finishes: I bias bound or Hong Kong finished all the seams which added dramatically to the time needed to make this dress.


It also meant that, when I realized that I had positioned added in-seam pockets way too low, the amount of unpicking required was insurmountable and I left them as-is.  Who cares that I effectively have to stretch to get my hand in my pocket?  Had I unpicked all that bias binding, I certainly would not have made deadline.


As it was I barely made deadline, and only did so because I wore it without having finished the top button (on the band collar) or some hand-sewing.

Nonetheless, I'm delighted with this dress.  Maybe it was partially because it felt so good to carve out time to do something creative, but I also learned how to do a type of collar and overcame my nerves about button holes.  (I had no time to be nervous about them and it turned out that they weren't that hard.)


PatternHelmi Tunic Dress by Named Patterns
Fabric: Nani Iro Brushed Cotton Little Letter from Red Beauty Textiles (now sold out)
Thread: Gutermann
Buttons: purchased at Stonemountain and Daughter Fabrics
Needles: Universal 80/12
Modifications: Added in-seam pockets (using tutorial from By Hand London); bias bound/ Hong Kong finished seams throughout (using this tutorial from JuJu Vail for the Hong Kong finishes).
Things I'll change next time: Higher pockets!  And maybe a longer skirt.  Use wider bias tape for shoulder seam allowances.  Wash off button hole placement marks before using fray check.


we made May 2017 (1 May to 7 May)


Last year, I was able to wear at least one me-made garment every day in the month of May.  This year, my me-made wardrobe has not caught up to current wardrobe constraints.  So I'm trying to wear two different me-mades each week.  I originally thought that I would just wear me-mades on two days during the week, but realized that I would probably just achieve that by wearing the above Linden top over and over and over again.  So I'm limiting repetition a little bit.  Last week, I wore that top (twice) and a yet-unblogged Helmi dress.  [Update: now blogged here.]  Most importantly, I got a picture with Jenny and Wamps who were also wearing tops they had made.  Hopefully, they will blog about them soon.

Saturday, April 15, 2017

a ghost of a trace of a pale imitation

Jumping a little bit out of order in my sewing history since I have no decent pictures of the Washi dresses, Mesa dresses, or Departure Shifts that I made over spring and summer 2016.   Since I'm traveling right now, I can't get pictures of them, but I have my Tamarack Jacket with me so here you go:


This project started after I saw the most amazing refashioned denim Tamarack Jacket and became enamored with it.  I'd liked the Grainline Tamarack jacket when it came out, but the longer, color-blocked denim version was what convinced me that I had to make it pronto.  As much as I would have liked to recreate that version, I wasn't in a time in my life where I could devote quite that much work to one make, so I took a number of shortcuts.  All of which resulted in a coat that isn't anywhere near as perfect as its inspiration, but is easily my most-worn me-made, since I have used it as my primary coat since (almost) completing it.

To approximate the look while saving some time, I bought some of the Art Gallery Denim studio fabric in the Fading Darts pattern.  I'd been interested in the denim studio fabrics since they were released but had been unable to find them in person to see what they were like.  I ordered a swatch of this one as well as another from Fabric.com to see if I should invest in the full yardage.  Of course, it then took me over a month to fully commit to the idea of sewing this jacket, by which time the Fading Darts pattern was sold out at Fabric.com.  So I ordered my yardage from Hawthorne Threads instead since they still had some in stock.  The Denim Studio fabrics do look like a printed denim but have the weight of a quilting cotton, making this project far more manageable for my machine.

I was planning to make the lining a patchwork of scraps of leftover Nani Iro brushed cotton.  However, it turned out that my scraps were very large, so, with a little careful pattern piece placement, I was able to get each individual piece from a single scrap and skip the patchwork.  I made my bias strips from the denim fabric and also used bias binding for the seam allowances.


I used bamboo batting from Stonemountain and Daughter Fabrics.  I'm still not sure that this was the right decision.  I wanted something lighter than wool for the Bay Area climate.  However, the bamboo batting is supposed to shrink when washed and can't be prewashed, so I will either decide to be okay with the batting shrinking or only dry clean this jacket.  (Of course, I forgot about that and marked a bunch of quilting lines on the lining with washable marker.  They aren't too noticeable, but still.)  That being said, I really like the weight and feel of the quilting so I'm happy with that.  I followed one of the quilting patterns suggested in the Tamarack pattern (3-inch spaced horizontal lines).  Though I thought I was being fairly careful, the quilting lines don't match up at all at center front so I clearly wasn't being careful enough.  I did stitch each quilting line twice to give it a little bit more visual emphasis.

I wanted a two-way zipper since I though that I'd need some more movement through the hips than the pattern would allow.  Luckily, Stonemountain and Daughter Fabrics had some 30" two-way, open-ended zips in stock.  I'd hoped for 28" (largely because that's what the Makery used in the inspiration coat) but was more invested in it being two-way so went for the 30".  I think I ended up lengthening the pattern by 8" to match the zip.  I followed instructions by What Katie Sews for the zipper mod, since the pattern closes with hook-and-eye fasteners, and bias bound the seam allowances.  (Since I still haven't gotten around to hand-stitching these down, they flop around a little awkwardly but I've been too lazy to do so since it doesn't really impact the functionality of the coat.)


The welt pockets were a new skill to learn on this project and I found them to be very satisfying once I realized that I had been thinking about them upside down.  (Until I had that realization, I just found them to be frustrating.)  I haven't yet finished the minimal amount of hand sewing involved in the pockets which is really pathetic, and will eventually impact functionality so I really should prioritize some crafting time to finish it up.


Though my jacket doesn't come anywhere close to its amazing inspiration, I still enjoy it and it has made me excited about the idea of sewing other outerwear.  I have fabric to make another Tamarack as a gift and have thoughts about making myself another shorter one this fall.


Friday, April 7, 2017

three cheers for the grapevine

(Sorry the fonts are so wonky on this post.  I've tried numerous strategies and can't get them to be consistent so am giving up.)

In March 2016, I (begrudgingly) diverted from my Fen obsession to make a Sewaholic Cambie dress to wear to a wedding in mid-April 2016.


I did a massive amount of internet research to find the right dress pattern before starting this dress and had actually settled on making the By Hand London Elisalex dress.  However, while endlessly researching, I had neglected to notice that By Hand London had pulled the Elisalex pattern to make edits before reissuing it.  So I had to come up with a new plan.


I consulted with Alexis, Jenny and Wamps as follows (excerpted due to excessive length):


"Sewing friends!

I'm going to a wedding on April 16th and have long wanted to make my own dress for it....
I had this dress in mind.  I would make it with the a-line skirt and I'd modify the neckline so that it was straight across and not shaped.  (Like this).  I purchased the olive version of this fabric for the Cambie.

But now I've started thinking about this dress (short sleeve version, but with a skirt that is longer than on that version.) and how I could use this fabric, which I purchased with no plan in mind but that it was pretty.  But it looks like double gauze works well for the Zeena dress. [note that I actually sent them the wrong link here and should have linked to this dress instead]

Help me decide!  I definitely will need to do a toile/muslin/dry-run for either of them so I need to make a decision and get started....

For the Cambie, I feel like the pluses are that it comes with a pretty detailed tutorial and I could learn how to do a lining.  For the Zeena, I'd get to learn how to do box pleats and everyone on the internet says that it's a really fast dress to sew.  (I have not found such estimates to be accurate for me, but I'm guessing that it would still be faster than the Cambie.)  For both, I'd get to learn how to do a zipper and a new type of pocket, and maybe I could work on pattern matching.... 

And then I also keep thinking that there must be a better option out there and keep searching for something else (which is how I found the Zeena which I had originally ignored because I didn't like the main picture on the pattern page). So I need advice so I can stop spending a bunch of time searching sewing blogs!...

PS#2: All I really want to sew are more Fen dresses, but I don't think that will quite cut it for this wedding.  And I should probably try to learn the zipper since that feels like it will open up a lot of new possibilities for me."

The vote came back and was unanimous in favor of the Cambie, so that's what I did.  However, I changed plans on fabric and used a bright blue Nani Iro double gauze for the fabric.  This had the advantage of being a bright blue double gauze and also not requiring pattern matching.  I lined it with a white and gray lawn from Stonemountain and Daughter Fabric (horrifying the staff there by using such fabric as a lining).


I probably should have chosen something slinkier, but wanted something that I knew would be easy to sew.  I also maybe should have chosen a plain color since the lining peeked out at places, but it worked out okay.

I did actually muslin the bodice, though then decided that the fit was good enough, probably because I didn't know what to do to make it better.  That's definitely an area of sewing where I'd like to improve since I often decide that the fit is good enough and don't work to make it excellent.  On the final dress, this showed, as I had to pull the straps/sleeves pretty tight to avoid gaping which wasn't as comfortable as it could have been otherwise.


Inside of pocket

But the dress came together fairly quickly after all my dithering and it turned out that learning to do an invisible zip was incredibly useful.  I brought a back-up store bought dress to the wedding, but was cleared by my former housemates to wear the Cambie so that's what I did.   Though it looks like I have no pictures from the wedding itself, which turned out to be a fancier affair than I expected.  In the end, I probably should have gone with a more formal silhouette than a-line or a more formal fabric, but I learned a lot making this dress and enjoyed the final product.  I look forward to being able to wear it again!


Monday, April 3, 2017

here it goes, here it goes, here it goes again, oh, here it goes again

Sewing in this post is circa October 2015 to April 2016.

The Fen pattern is what convinced me that I needed to start writing the details of my sewing down.  I've made 4 Fen Dresses and 2 Fen tops and made slight pattern modifications for all of them, but I can't now remember which I should repeat in the future.  And I do want to repeat this pattern in the future.  I feel a little silly in wanting more Fens in my closet; nonetheless, I want more Fens in my closet.  And I have fabric that would have become a 5th Fen dress if I hadn't needed to take a break from the pattern.

The Fen pattern has many options, but I've tended to choose the same ones.  I really like the length of the sleeve so have used it for all of my Fens.  I'm also not generally a fan of v-necks so have always used the crew neck.  So the only options I've really tried have been the hem variations and the dress/top variations.

Here are the details I do remember about my Fens:

Fen Dress #1: October 2015:  Long sleeves, crew neck, high-low hem.  Made with Robert Kaufman Brussels Washer in Black, underlined with black lawn.  I'd ordered the Brussels Washer fabric and thought it would be fine on its own.  When it arrived, I though it was too sheer and found some black lawn at Piedmont Fabrics to underline it.  (The lawn cost more than the Brussels Washer fabric, sadly!)  The staff at Piedmont Fabrics were super helpful in discussing underlining options with me; they are really great at providing advice that works within the constraints of one's sewing ability/experience.  The two fabrics created a really nice drape together.


I was in a rush to make this one and didn't love the final product.  It was kind of overwhelming on me, being a lot more black fabric than I usually would wear.  I quickly shortened the sleeves by turning up a larger hem and that helped.  After I'd worn it to its intended event, I took out the sloppy sleeve hems with the intent of shortening them properly.  And then I couldn't decide if I should just remove them altogether so it has sat in a basket waiting for me to decide ever since then.  Not the most auspicious start to the Fen pattern, but it sure recovered.

Fen Dress #2: December 2015-January 2016: Long sleeves, crew neck, high-low hem.  Made with Nani Iro brushed cotton.   I took a break from selfish sewing through Christmas and then rewarded myself by sewing this afterward.  I spent a long time thinking about pattern placement and cut pieces on the cross grain to get the right placement, but in the end, it just looked random so that was probably not the best use of time.  I hemmed it right before going to church so I could wear it that day.  I'd lengthened both the bodice and the skirt and think I probably lengthened them a scotch too much since it looks a little oversized on me.  It works well with boots, though.


Fen Top #1: January 2016: Long sleeves, crew neck, shirttail hem.  Made with Nani Iro double gauze.   This shirt revealed perhaps the only flaw of the Fen pattern (in my opinion) which is that I don't think the instructions are sufficient for a beginner like me to achieve a nice curved shirttail hem.  Nonetheless, this top is super comfortable and I wear it often.


Fen Top #2: January or February 2016 (?): Long sleeves, crew neck, high-low hem.  Made with Nani Iro brushed cotton.  I don't think I have any pictures of this top, but I completely love it.

Fen Dress #3: February 2016: Long sleeeves, crew neck, shirttail hem.  Made with Cloud 9 corduroy (Elizabeth Olwen design) and underlined with Anna Maria Horner Eucalyptus rayon.  I really love both of these fabrics, but together they probably read more homemade than some of the other Fens.  I'd also hoped that underlining would allow me to wear this over tights without bunching and that hasn't been the case for me.  It seems I should have done a separate lining that could move on its own to avoid tights-bunching.  For this one, I do remember that I lengthened the skirt by 2 inches only to have to chop off 2 inches when I tried it on and it was an unflattering length.  Of the 3 green Fen dresses, this is the least worn.


Fen Dress #4: March 2016: Long sleeves, crew neck, high-low hem.  Made with Cotton and Steel canvas.  I was basically copying one of the Fen samples exactly, though I now can't find the blog post on the Fancy Tiger Crafts blog with the sample to show you what a copy-cat I was.  Please just trust that I was imitating the sample as identically as I could.  This is probably my favorite of all of the dresses, despite my super lame pattern matching.  (I matched almost perfectly on one pocket and was a total fail everywhere else on the dress.)


Although 3 of my Fen dresses are green, I think that they actually look pretty different from each other.  Or maybe that's just wishful thinking since it allows me to contemplate making more Fens in the future...

Wamps has also made a delightful Fen in the more recent past, so maybe she will chime in with details about hers?  Fingers crossed!  In the meantime, here are some poor snaps of it for you all to enjoy.