Showing posts with label Cotton & Steel. Show all posts

Sunday, August 13, 2017

Peer pressure is real

Here is a skeptical  face with my newest self-made frock.  It's my third Laurel, by Colette Patterns, and despite the expression I'm sporting, I'm relatively pleased.  


The Laurel is a relatively basic sheath dress that is a great use for fun fabrics.  This one is a Cotton and Steel quilting cotton that I lined with a kind of fuschia/magenta in order to give it better drape and to make it nice and soft and slinky on the inside.  (Sarah Watts, Cat Lady, Purrfect Hiding Spot)

These are cut relatively short, so they fall a few inches above the knee for me, which is perfect for wearing with leggings (ie, my favorite outfit combination.)

As I mentioned in the instagram post about this dress, I totally forgot to add my custom pockets.  I used french seams to close all of the seams, so at least for now, I'm just going to leave it pocket less.  I'll be honest though, having pockets is like half of the point of making your own dresses, so I may find the time to undo and add them back in.

The Laurel uses bias tape to bind the sleeve and neckline, but as I'll discuss in a minute, I don't like that look, so I used the bias tape to instead creating a folded seam for the neckline.  There is probably a more official way to say this.  Though this worked perfectly on a Laurel top I'm gifting to my mom, you can kind of see in this picture that the neckline is basically perpendicular to my body.  This is not how necklines should lie.  Again, we'll see if I do anything about it.  Maybe it'll loosen up after a wash?

Just finished this, so no notes on wear yet, though.......

Below is my second Laurel.  I LOVE this dress and would wear it all of the days.  I installed the sleeves upside down, and I really don't like the bias tape as binding for the neckline and sleeves.  It's hard to sew and capture both sides, and my stitching loops sloppy and therefore more homemade. Also, anyone who can point to a ready made garment that uses bias tape like this wins a prize, because I don't think it happens.

Despite all of those criticisms, as I said, I looooove this dress.  It's black and white, so I feel like it's 100% work appropriate, but it's another Cotton and Steel by Alexia Marcelle Abegg, and while it's name is kinda of eh, I think I read a description of it as being 'all of the things you would find in a magical barn', so I call it my magical barn dress.  Yes, there are rabbits, of course.


Not picture are:

1) my very first Laurel, which might have been a second or third dress?  It was a wearable muslin I made with maybe 2 yards, but maybe less of a green corduroy I had purchased to make a skirt.  That's the other thing great about this pattern! It's only a few pieces (front, back, sleeves, bias binding), and it's light on fabric    I like it, and have worn it belted and not belted, but because the dress and styling are so plain, I do like the print version better - more visual interest.  

3) A Laurel top I made that my mom will receive when I remember to go to the post office.  I used HEB's old curtains, and it's light and airy and I quite like the shape.  I was trying to test out how to do a Full Bust Adjustment, and used bad instructions, so I decided to just make the top normally, but then forgot to readjust the sizing.  Ah well, nice to give my mom a handmade top.  But I would put the Laurel top on my sewing list for tops. Nice length and decent visual interest.

OH, and a note on these - I did an invisible zipper for the two pictured, without an invisible zipper foot, but using this tutorial, and found it very easy both times.  Highly recommended. 

Monday, May 15, 2017

me made May 2017 (8 May to 14 May)

I exceeded my me-made goal this week and wore me-mades on 4 days plus a me-made pajama top on a few days.  One day, I wore the same Linden shirt that I wore last week.  Here are pictures of the additional me-mades from this week (pajamas not pictured):

A Grainline Linden

A Grainline Scout

A Named Patterns Helmi

Clearly, right now, the Linden is getting a ton of wear, and stretchy knits work well for me.  I should maybe reassess my sewing goals for 2017 as they involve no knit patterns, and having a few more me-made knit options would be nice!


Saturday, May 13, 2017

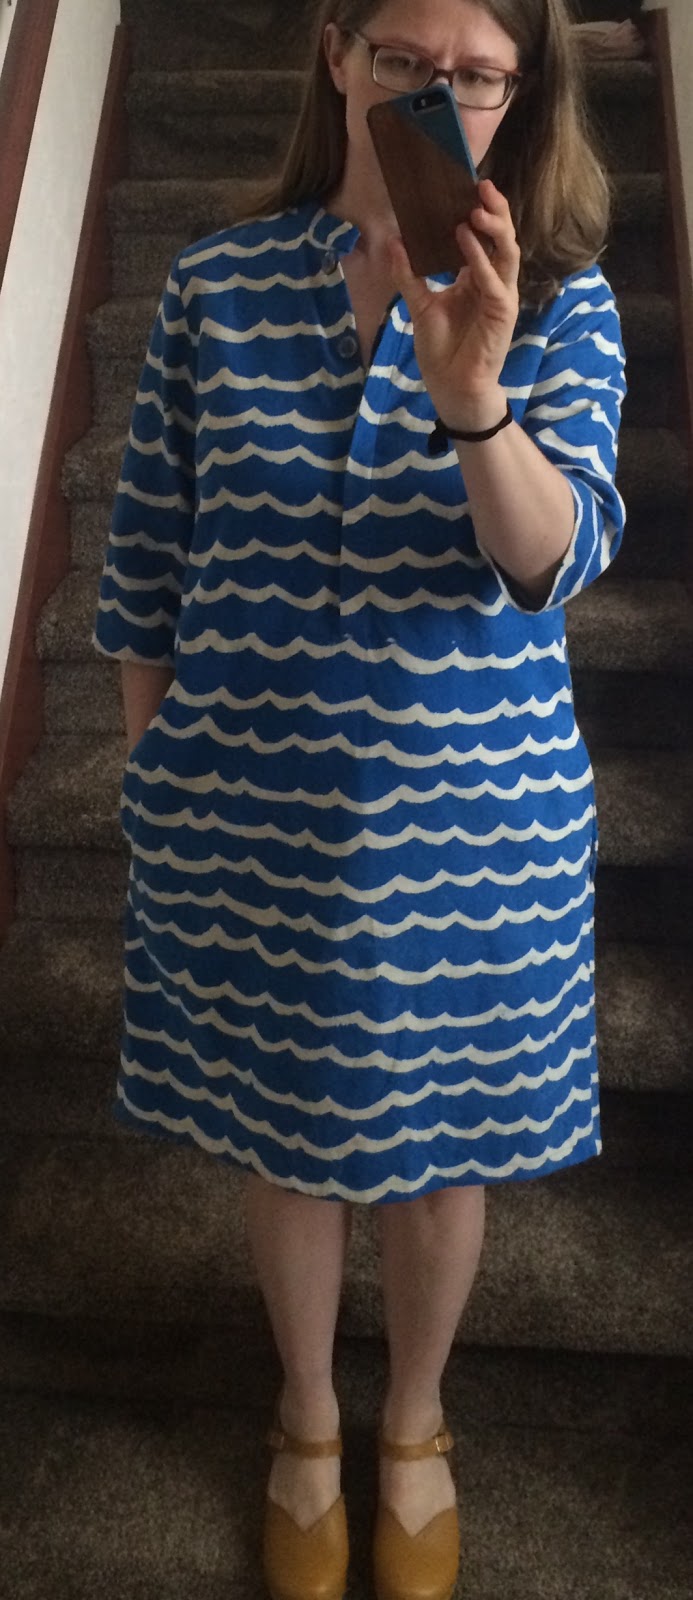
rough seas, they carry me


After succesfully making one dress with buttons, I was excited to try to make another for my Easter dress.  I had some Cotton and Steel canvas that I'd wanted to use for a yoked shift dress, however I changed tack upon conferring with Jenny and Elizabeth and decided to make another Helmi.  Since I couldn't find a shift dress pattern that was exactly what I wanted and I didn't really have time to do a muslin, sticking with the Helmi made a lot of sense.

I cut this one a size smaller than my first because I wanted slightly narrower shoulders and the pattern has so much ease that grading wasn't necessary.  I found it to be incredibly difficult to pattern match with this fabric though I tried.  I struggled to even figure out where the repeat was so ultimately settled for good enough.  This worked out okay on the placket but not as well on the side or waist seams.


I again did a mixture of bias binding and Hong Kong seam finishes, using bias strips from quilting cotton that had fishes on it to coordinate with the waves on the canvas.  I used my new clapper to try to flatten the seams to make sewing with the canvas less cumbersome.


I modified the hem to be a high-low hem.  There's probably a better way to do this, but I just lengthened the side seams to the bottom of the shirttail hem and then borrowed the shaping from the Fen pattern pieces, if that makes sense.  I changed up the construction so that I sewed the hem after sewing the side seams since I wasn't doing the shirttail hem.


Again, I added in-seam pockets.  This time, I used a tutorial from Megan Nielsen that includes suggestions of when to finish the various seams, which my sleep-deprived brain found super useful.  In the tutorial, Megan Nielsen shares her trick for making sure the pockets line up.  While reading it, I thought, "Why wouldn't you just know that they lined up because you'd measured properly?"

And then I sewed one pocket piece at 3.75" below the waist and its matching piece at 4.25" below the waist.


I don't know how I managed to do that, except, well, sleep deprivation.  But I very much felt like my hubris had been my downfall, and that I need to cross stitch a sampler with the motto, "Measure twice; bias bind all your seam finishes once."  I had bound all those seams by the time I realized my error and since no one would know about it except me, I didn't bother fixing it.  And now you all know about it.

I found buttons that I thematically loved for this fabric since they looked like driftwood.  However, they were too large for the concealed placket so I scrapped them for other buttons that were reminiscent of driftwood but not as great.  Because these buttons were still a little large, I left off the top collar button and buttonhole.  I knew that I would never use that button and it got very close to the first button on the placket which looked odd to me.


Despite the pocket debacle, I'm pleased with this dress, love the fabric and am thrilled that I got to make my Easter dress this year.


Summary:

Pattern: Helmi Tunic Dress by Named Patterns
Fabric: Cotton and Steel Waves Canvas, purchased at Hawthorne Threads; Cotton and Steel Sardinha Neutral Quilting Cotton for bias strips, also purchased at Hawthorne Threads (now sold out)
Thread: Gutermann 248 (blue); random grays and creams when matching bias tape
Buttons: purchased at Piedmont Fabrics
Needles: Universal 80/12 for attaching bias strips to main fabric; Jeans 100/16 for construction seams
Modifications: Added in-seam pockets (using tutorial from Megan Nielsen); replaced shirttail hem with slight high-low hem using Fen dress pattern as guide; bias bound/ Hong Kong finished seams throughout (using this tutorial from JuJu Vail for the Hong Kong finishes); used bias strip facing for skirt hem (using this tutorial from Colette); left off collar button and buttonhole.
Things I'll change next time: Press seam allowance for inner collar stand at a scant 3/8" to make it easier to catch when stitching in the ditch; smaller buttons; maybe a slightly longer skirt if high-low hem used again; place pockets at the same location.


Monday, April 3, 2017

here it goes, here it goes, here it goes again, oh, here it goes again

Sewing in this post is circa October 2015 to April 2016.

The Fen pattern is what convinced me that I needed to start writing the details of my sewing down.  I've made 4 Fen Dresses and 2 Fen tops and made slight pattern modifications for all of them, but I can't now remember which I should repeat in the future.  And I do want to repeat this pattern in the future.  I feel a little silly in wanting more Fens in my closet; nonetheless, I want more Fens in my closet.  And I have fabric that would have become a 5th Fen dress if I hadn't needed to take a break from the pattern.

The Fen pattern has many options, but I've tended to choose the same ones.  I really like the length of the sleeve so have used it for all of my Fens.  I'm also not generally a fan of v-necks so have always used the crew neck.  So the only options I've really tried have been the hem variations and the dress/top variations.

Here are the details I do remember about my Fens:

Fen Dress #1: October 2015:  Long sleeves, crew neck, high-low hem.  Made with Robert Kaufman Brussels Washer in Black, underlined with black lawn.  I'd ordered the Brussels Washer fabric and thought it would be fine on its own.  When it arrived, I though it was too sheer and found some black lawn at Piedmont Fabrics to underline it.  (The lawn cost more than the Brussels Washer fabric, sadly!)  The staff at Piedmont Fabrics were super helpful in discussing underlining options with me; they are really great at providing advice that works within the constraints of one's sewing ability/experience.  The two fabrics created a really nice drape together.


I was in a rush to make this one and didn't love the final product.  It was kind of overwhelming on me, being a lot more black fabric than I usually would wear.  I quickly shortened the sleeves by turning up a larger hem and that helped.  After I'd worn it to its intended event, I took out the sloppy sleeve hems with the intent of shortening them properly.  And then I couldn't decide if I should just remove them altogether so it has sat in a basket waiting for me to decide ever since then.  Not the most auspicious start to the Fen pattern, but it sure recovered.

Fen Dress #2: December 2015-January 2016: Long sleeves, crew neck, high-low hem.  Made with Nani Iro brushed cotton.   I took a break from selfish sewing through Christmas and then rewarded myself by sewing this afterward.  I spent a long time thinking about pattern placement and cut pieces on the cross grain to get the right placement, but in the end, it just looked random so that was probably not the best use of time.  I hemmed it right before going to church so I could wear it that day.  I'd lengthened both the bodice and the skirt and think I probably lengthened them a scotch too much since it looks a little oversized on me.  It works well with boots, though.


Fen Top #1: January 2016: Long sleeves, crew neck, shirttail hem.  Made with Nani Iro double gauze.   This shirt revealed perhaps the only flaw of the Fen pattern (in my opinion) which is that I don't think the instructions are sufficient for a beginner like me to achieve a nice curved shirttail hem.  Nonetheless, this top is super comfortable and I wear it often.


Fen Top #2: January or February 2016 (?): Long sleeves, crew neck, high-low hem.  Made with Nani Iro brushed cotton.  I don't think I have any pictures of this top, but I completely love it.

Fen Dress #3: February 2016: Long sleeeves, crew neck, shirttail hem.  Made with Cloud 9 corduroy (Elizabeth Olwen design) and underlined with Anna Maria Horner Eucalyptus rayon.  I really love both of these fabrics, but together they probably read more homemade than some of the other Fens.  I'd also hoped that underlining would allow me to wear this over tights without bunching and that hasn't been the case for me.  It seems I should have done a separate lining that could move on its own to avoid tights-bunching.  For this one, I do remember that I lengthened the skirt by 2 inches only to have to chop off 2 inches when I tried it on and it was an unflattering length.  Of the 3 green Fen dresses, this is the least worn.


Fen Dress #4: March 2016: Long sleeves, crew neck, high-low hem.  Made with Cotton and Steel canvas.  I was basically copying one of the Fen samples exactly, though I now can't find the blog post on the Fancy Tiger Crafts blog with the sample to show you what a copy-cat I was.  Please just trust that I was imitating the sample as identically as I could.  This is probably my favorite of all of the dresses, despite my super lame pattern matching.  (I matched almost perfectly on one pocket and was a total fail everywhere else on the dress.)


Although 3 of my Fen dresses are green, I think that they actually look pretty different from each other.  Or maybe that's just wishful thinking since it allows me to contemplate making more Fens in the future...

Wamps has also made a delightful Fen in the more recent past, so maybe she will chime in with details about hers?  Fingers crossed!  In the meantime, here are some poor snaps of it for you all to enjoy.


Monday, March 27, 2017

all straight things must bend

The Grainline Scout tee.  Like the Linden opened up a world of patterns for me, the Scout taught me not to fear setting in sleeves and how to bias bind a neckline properly.

My first attempt was yet again in Cotton and Steel rayon.  While I liked how the pattern came together, it was a wee bit short for my taste and I rarely wear this version.


As you can see, I didn't perfectly set the sleeves, but since I didn't realize it was possible to do better than this, I left them as is.

My second version was another Leah Duncan Art Gallery voile.  I followed this tutorial to use French seams throughout, including at the sleeve cap, and I lenghtened it by 2 inches.  This worked well for me, and this top is often worn, though I don't think I have any pictures of it.

I then followed another Grainline tutorial to lengthen the Scout sleeves to elbow length.  My first attempt at this produced sleeves that were just slightly too narrow: not quite bad enough to notice immediately but uncomfortable after being set in.  So I scrapped them and recut the sleeves a little bit wider.  I was using a lovely Nani Iro brushed cotton and just barely had enough to get the right pattern on the front of the recut sleeve.


I decided to make a neckband for the neckline rather than finish it with a bias binding, since the brushed cotton is a little thicker.  I love this top and wear it often.  

Following that success, I made another with longer sleeves from a Japanese textured cotton found at Stonemountain and Daughter.   

I tried my darndest to pattern match along the side seams, and while I did get the pattern to line up, I cut one of the pieces backwards so the design does not match correctly.  (You can sort of see this in the second-to-the-bottom picture.). Nonetheless, this is another favorite that I wear often.


Thinking about how much I enjoy wearing three of my four Grainline Scouts has made me wonder why I haven't made more of them!

Thursday, March 16, 2017

wade in the water

I have been knitting lately, but never documenting, and a lot of my crafting time has gone into a new interest in sewing.  Yesterday, while organizing my sewing patterns, I realized that I'd better write down some notes before I forgot everything.  (I pretty much have forgotten everything, but I can collect what I can remember.)  I know no one is reading this blog anymore, but I'll at least have some record.  I'm going to try a few posts to catch up on the sewing that I've done so far and then will hopefully keep more detail about projects moving forward.

The events in this post are circa April to July 2015.

The first pattern that got me excited about sewing was the Purl Bee Boxy Tee.  True to its name, this pattern produces a totally wearable t-shirt out of a few rectangles of fabric.  Wamps had gotten me pretty comfortable with a rotary cutter and mat, so I wasn't intimidated by the idea of cutting rectangles.  (Come to think of it, that's how I started knitting, too, with a book of cushion patterns that didn't intimidate me because they were just squares.)

The other motivating factor was that I had fallen in love with some Cotton and Steel rayon.  I ran into their rayon substrate at Stonemountain and Daughter Fabric while looking for some flannel for a lap blanket (also a Purl Soho pattern).  It was beautiful and silky and the Stonemountain employees assured me that it was easy to sew with as long as I had thin thread so I impulse purchased it.

Several weeks later, all the rayon had given me was complete grief.  I was trying to make circle scarves out of it, but kept getting ridiculous thread nests and horrible tension problems and was about to throw out any idea of ever sewing with anything other than 100% cotton.  I tried researching solutions, but while the internet had lots of articles about how rayon was produced, I found very few useful tips about avoiding the problems that I was having sewing with it.  (Colette has now done a series about sewing with the Cotton and Steel substrates, but I don't think it includes the tips that made a difference for me.)  Anyway, eventually I found a site (which I unfortunately don't remember) that suggested a ballpoint needle.  And maybe the same site, or another site, suggested using spray starch to stabilize the rayon before sewing.  Both of those tricks turned out to be game changers for me and my circle scarves were completed.


It also helped to make sure that all the fuzz from lap blankets was brushed out of my machine.  Once the scarves were done and gifted, I was excited to try a top out of this fabric.

My first attempt at the boxy tee went better than I expected.  I messed up the neckline since I thought it was supposed to be a neckband rather than a bias binding (in retrospect, I should have been able to figure that out from the picture but I'd never sewn a neckline before so I didn't understand the directions).


As you can see, the neckline stood away from my neck.  I added some ad hoc and improperly constructed darts to make it lie flat.  And then I wore that top everywhere.  It is probably one of my most worn things that I have made.  The lovely color plus the drape of the rayon make this top work really well under suits/cardigans, both of which hide the awkward darts.


Given that success, I thought I'd just make a bunch more boxy tees.  So I cut into some lovely textured Liberty (not Tana Lawn) that I purchased on our honeymoon.  And it turned out that I'd been really lucky with my first top since the second looked like this:

Pretty bad and too bulky to be hidden under a cardigan.  I'm not entirely sure still how it tuned out so bad; there's definitely less drape to the fabric and Purl had enlarged the sleeves on the pattern between these two versions so maybe the proportions are just off, but it was startling how bad it was. If this had been my first attempt, I'm not sure I would have persisted so it was lucky the rayon one was first.

I tried again with an Art Gallery voile designed by Leah Duncan.  That turned out much better; their fabric had the right drape.  However, I have no pictures of it since the thin fabric didn't hold up to wear as well so it is in a basket waiting to be mended.

Around the same time, I talked Jenny and Elizabeth into "sewing days" which really helped me to become much more prolific with sewing.  Rather than spend hours online researching something, I could bounce ideas off of them and get advice.  And it made sewing more social as well, which made it feel more like knitting.  I think our first sewing day was on July 3, 2015, and you can see that Wamps was working on her own boxy tee:


Around this time, Wamps started talking about how great it was that I just plowed ahead with my "wearable muslins" and I tried to pretend that I knew what she was talking about.

Next time: I follow a pattern not made of rectangles.